Monday, December 26, 2011

Xtext 2.1: using Xbase variables

See the original post here:

Xtext 2.1: using Xbase variables

In this post, I’d like to continue to inspect how to use only a small part of Xbase and still have the control on the generation part: in particular (for other projects) I would like to retain the control on the generation for my model, while relying on the Xbase generation for the Xbase parts. Thus, in this post I’ll describe:

  • how to integrate Xbase variables (XVariableDeclaration) and expressions (XExpression) in your DSL
  • how to extend Xbase scoping for making the variables visible in the expressions
  • write a generator for your DSL and reuse the XbaseCompiler for the code of XVariableDeclaration and XExpressions

Wednesday, November 23, 2011

Xtext 2.1: using Xbase expressions

See the whole blog post here:

Xtext 2.1: using Xbase expressions

I’d like to inspect how to use only a small part of Xbase and still have the control on the generation part: in particular (for other projects) I would like to retain the control on the generation for my model, while relying on the Xbase generation for the Xbase parts. Thus, in this post I’ll describe:
  • how to integrate Xbase expressions (XExpression) in your DSL
  • write a generator for your DSL and reuse the XbaseCompiler for the code of XExpressions

Monday, November 21, 2011

Using JVM Types in Xtext 2.1 and the ImportManager

Using JVM Types in Xtext 2.1 and the ImportManager

Sunday, October 30, 2011

Testing the Eclipse StatusLineManager

Here's the link to a new post, where I explain how to test the current text of the Status Line in Eclipse

Testing the Eclipse StatusLineManager

Wednesday, May 25, 2011

PhpBibliography goes International

The new version of PhpBibliography, 1.1.1, provides a new feature: Internationalization!

2 languages, besides English, are now supported: Italian and French.

I must thank David CHEMOUIL, who opened a feature request, and provided the French translation (of course, I did the Italian one :)

Now, the phpbibliography user can choose the language using the three flags on the top right corner; switching language will lead you to the same page you were visiting but in the selected language. The chosen language will be remembered, so you can keep surfing (or editing) the site with the selected language.

Here are some screenshots:


Tuesday, May 24, 2011

Making microphone work in Kubuntu Natty

After I switched to Kubuntu Natty 11.04, my microphone stopped working (especially in Skype). I tried to adjust the microphone settings in Phonon System Settings, but, besides having too many devices to choose from, that settings dialog seems to have a bug which prevents the preferences to being saved. Not to mention that there is no way to test the input device from that setting dialog!

Luckily, in that bug report I also found the solution to have microphone work!

The solution consists in installing the package pavucontrol, which provides a comfortable PulseAudio Volume Control dialog, which also gives you immediate feedback to see whether the microphone is working, and reduces the number of devices to choose from!

After you installed that package, Skype options dialog presents a button to open that volume control dialog


If you click the button you'll get the pavucontrol dialog, and in "Input Devices" tab you can choose the input device from the list and instantly check whether that's the right device: just speak in the microphone, and see whether the horizontal bar moves while you're speaking.


That's all! Now you're microphone is set correctly. :)

Sunday, May 22, 2011

Using Savannah with Mylyn

The GNU software I maintain, Source-Highlight, Gengetopt and Gengen, are hosted on Savannah, which has its own bug tracking system. Recently I've started to use the wonderful Mylyn tool under Eclipse for but and feature tracking (in general, "tasks"), and I wanted to use it also with Savannah, but since there is no specific connector, we can use the generic web connector (actually, having a specific connector would be better, but for the moment, that's better than nothing ;)

Since there is not a template ready to use for accessing Savannah from Mylyn, I thought I could blog about my experience, hoping that it's useful to others.

First of all, you need mylyn in eclipse together with its ui functionalities (but if you downloaded an eclipse distribution you'll likely have it already); then you need to install the Web Templates Connector, from the update site http://download.eclipse.org/tools/mylyn/update/incubator (add a repository)


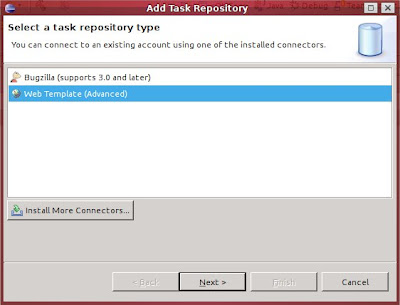
Then, after you restarted eclipse, open the Task Repositories View, choose Add Task Repository, and select Web Template,


For this tutorial I will use my GNU project Source-Highlight as an example:

  • Server: https://savannah.gnu.org/bugs/?group=src-highlite
  • Label: choose a label to represent your task repository
  • put your savannah username and password
  • Additional Settings
    • Add two parameters:
      • group with value the name of the project on savannah (in my case it's src-highlite)
      • tracker with the specific kind of tasks you want to follow on savannah (e.g., bugs, or patches, etc.)
  • Advanced Configuration
    • Task URL: https://savannah.gnu.org/${tracker}/?
    • New Task URL: ${serverUrl}&func=additem
    • Query Request Pattern: ${serverUrl}&chunksz=150&report_id=100
    • Query Pattern:
      <td.*?#({Id}[0-9]+).*?/td>\n<td ><a.*?>({Description}.*?)</a></td>


When you click Finish, also accepts to add a query for the repository.

In the query properties dialog you can check whether all the inserted parameters for the task repository are correct, by clicking on the preview button (you should see a list of bugs, otherwise the dialog should tell you that query is not correct and cannot produce results)


Now, if you open the view Task List, you should see the bugs related to your query.


Now clicking on a bug will open a browser editor window in eclipse and you access that bug page. Remember that, since you access the savannah repository through a generic web connector you won't be able to enjoy the typical Mylyn rich editor for bugs, like the ones for bugzilla and trac). However, you'll still have the context tab and the private tab.


Hope this helps :)

Tuesday, March 22, 2011

Problems with microphone in Linux

I was experiencing problems with the microphone (in Skype) in Kubuntu Maverick 10.10: no input was received by the microphone, either in Skype or using the arecord. The soundcard is an

Intel [HDA Intel], device 0: AD198x Analog [AD198x Analog]
and kmix was showing the capture device's volume at the maximum.

I don't know whether KDE configuration was spoiled by something, e.g., an update. However, I solved the problem by setting the capture source to the front mic, using alsamixer command line command (kmix does not seem to show any option about this).

So, if you have similar problem, run alsamixer from the command line, press F4 so that it shows only the Capture devices, set the volume of the capture devices (in my case Front mic) as high, and, most importantly, set the Input sources of capture (in my case Front mic).


Now your mic should work!

Tuesday, February 08, 2011

Find and Rename files in Linux

I had to rename many files (in particular their extensions) which were spread throughout many folders.

I already knew find and rename utilities but I had never used them together...

here's the command line to rename all files in all the folders of the current directory with extension .first to .second

find . -name "*.first" -exec rename -v 's/\.first$/\.second/' {} +

hope this helps :)

Thursday, January 13, 2011

Compile Linux Kernel in Ubuntu with KernelCheck (and Nvidia drivers)

I've always recompiled Linux kernel on all my Linux installations, starting from the kernel sources of the Ubuntu repositories. Then I've heard about the famous 200 lines kernel patch, that I wanted to try, but it doesn't seem to apply to ubuntu linux sources (or at least I had this impression), and I didn't want to try the alternatives.

Then I stumbled upon this nice article about using KernelCheck (which I didn't know) to compile the linux kernel (not from the ubuntu repositories):

a graphical user interface program designed to make the kernel-compiling process as easy as the click of a button. KernelCheck will fetch the latest information from http://www.kernel.org, which hosts the source packages for the Linux kernel, and ask the user which one they would like to compile into a .deb package (with the option of installing the kernel after the compilation).
The article also applies the 200 lines patch, so I decided to give it a try! The articles shows a video, but I'd like to blog about my experience with some screenshots.

Most important, I decided to blog about my experience because of the Nvidia drivers I have on some of my Linux computers, since the first experience with KernelCheck and nvidia drivers was really bad. I think I found a solution to deal with these drivers, so that I can compile the kernel, the patch, and have nvidia drivers work without a problem :)

After you installed kernelcheck, and run it you'll have some screens, and first of all you must retrieve available kernel information:


Then I select the custom compilation


Now, you can select some options.

At this point, it is crucial
  • NOT to select the reconfiguration of X server
  • NOT to install the nvidia driver
  • to select "apply custom patch to the kernel" (if you want to try the 200 lines patch)
  • I prefer not to install the kernel package after compilation: I'll do that myself


After the download of the needed packages is finished, you'll get a terminal window where you can apply manually the patch (that you can download it from here), and apply it, as it is shown in the screenshot (then you need to close the terminal window)


Then, you'll get the chance to configure the kernel before compilation. Make sure you have all the options you need set (it looks like kernelcheck starts from the current configuration, so, for instance, the processor family is already set as your current configuration).

To enjoy the 200 lines kernel patch, you must enable "Automatic process group scheduling" under "General setup", as shown in the following screenshot:


Then, the compilation starts, and, you know, it might take some time (though for my computer, and configuration it takes less than 1 hour)


Then, you'll be suggested to reconfigure the X server... DON'T DO THIS, and answer no


Then, the kernel deb packages (-image and -headers) will be ready in /usr/src, and you can manually install them.

Note that, during the installation, the Ubuntu kernel utilities will smartly compile and configure the current nvidia modules for you!

Now, reboot and enjoy :)

P.S. I cannot swear my computer is faster now with the 200 lines kernel patch... but I have the impression it is :)