Wednesday, December 23, 2009

GNU Source-Highlight 3.1.2

In this new version of GNU Source-Highlight some new features were added:

  • infer language for files starting with <? and <!doctype
  • qmake based build system available is available to be used as an alternative to the configure based one; this is useful to compile source-highlight with MSVC for instance
  • searches for home directory correctly also on Windows systems
Besides this, many new language definitions were added:

asm


;
; screen handling primitives
;

.model large

.data

vseg dw 0b000h
vmode db ?
x dw 0
y dw 0
color db 07h
ofs dw 0
xhite db 8

; video information block


applescript


(*
TODO just a comment

foo bar
*)

displayName(choose file with prompt "Select a file:") --if double-clicked
return -- not needed, but shows that the script stops here when "run"

on open of finderObjects -- "open" handler triggered by drag'n'drop launches
repeat with i in (finderObjects) -- in case multiple objects dropped on applet
displayName(i) -- show file/folder's info
if folder of (info for i) is true then -- process folder's contents too
tell application "Finder" to set temp to (entire contents of i)
repeat with j in (temp)
display dialog j as string -- example of doing something with each item
end repeat
end if
end repeat
end open

if CurState is 0 then
connect configuration "pccard-serial"
end if

on GetParentPath(myPath)
set oldDelimiters to AppleScript's text item delimiters -- always preserve original delimiters
set AppleScript's text item delimiters to {":"}
set pathItems to text items of (myPath as text)
if last item of pathItems is "" then set pathItems to items 1 thru -2 of pathItems -- its a folder
set parentPath to ((reverse of the rest of reverse of pathItems) as string) & ":"
(* The above line works better than the more obvious set parentPath to ((items 1 thru -2 of pathItems) as string) & ":"
because it will not return an error when passed a path for a volume, i.e., "Macintosh HD:", but rather will return ":"
indicating the desktop is the root of the given path. Andy Bachorski <andyb@APPLE.COM> *)
set AppleScript's text item delimiters to oldDelimiters -- always restore original delimiters
return parentPath
end GetParentPath


awk


$6 !~ /^ack/ && $5 !~ /[SFR]/   {
# given a tcpdump ftp trace, output one line for each send
# in the form
# <send time> <seq no>
# where <send time> is the time packet was sent (in seconds with
# zero at time of first packet) and <seq no> is the tcp sequence
# number of the packet divided by 1024 (i.e., Kbytes sent).
#
# convert time to seconds
n = split ($1,t,":")
tim = t[1]*3600 + t[2]*60 + t[3]
if (! tzero) {
tzero = tim
OFS = "\t"
}
# get packet sequence number
i = index($6,":")
printf "%7.2f\t%g\n", tim-tzero, substr($6,1,i-1)/1024
}

BEGIN{
buffer = "";
}

/\015*$/ {
gsub(/\015*$/, "");
}

/^%%S NL/ {
print "";
next;
}


bat


@ECHO OFF
REM - LABEL INDICATING THE BEGINNING OF THE DOCUMENT.
:BEGIN
CLS
REM - THE BELOW LINE GIVES THE USER 3 CHOICES (DEFINED AFTER /C:)
CHOICE /N /C:123 PICK A NUMBER (1, 2, or 3)%1
REM - THE NEXT THREE LINES ARE DIRECTING USER DEPENDING UPON INPUT
IF ERRORLEVEL ==3 GOTO THREE
IF ERRORLEVEL ==2 GOTO TWO
IF ERRORLEVEL ==1 GOTO ONE
GOTO END
:THREE
ECHO YOU HAVE PRESSED THREE
GOTO END
:TWO
ECHO YOU HAVE PRESSED TWO
GOTO END
:ONE
ECHO YOU HAVE PRESSED ONE
:END

:: Renames a Text File with the Current Date as the Name
:: The File Extension is Kept
::
C:\BATCH\DOS\XSET CUR-DATE DATE YY-MM-DD
REN %1.* %CUR-DATE%.*

IF "%1" == "" XCOPY B:\*.*
IF NOT "%1" == "" XCOPY B:\%1
ECHO.
C:\BATCH\DR

FOR %%F IN (%1 %2 %3 %4 %5 %6 %7 %8 %9) DO DEL %%F


clipper


Function MAIN()
LOCAL number
INPUT "Key in a number: " TO number
IF number % 2 = 0
? "You keyed in an even number"
? "I can prove it:"
? "the result of ",number," % 2 = 0 is ", number % 2 = 0
ELSE
? "You keyed in an odd number"
? "I can prove it:"
? "the result of ",number," % 2 = 0 is ", number % 2 = 0
ENDIF
RETURN

/* Load the table.dbf and table.cdx, on unix,
you should ensure that file extensions are on
lowercase.*/
USE table INDEX table VIA "DBFCDX"
REINDEX


cobol


      $ SET SOURCEFORMAT "FREE"
IDENTIFICATION DIVISION.
PROGRAM-ID. ShortestProgram.

PROCEDURE DIVISION.
DisplayPrompt.
DISPLAY "I did it".
STOP RUN.
* Uses the ACCEPT and DISPLAY verbs to accept a student record
* from the user and display some of the fields. Also shows how
* the ACCEPT may be used to get the system date and time.
WORKING-STORAGE SECTION.
01 Num1 PIC 9 VALUE ZEROS.
01 Num2 PIC 9 VALUE ZEROS.
01 Result PIC 99 VALUE ZEROS.

PROCEDURE DIVISION.
DISPLAY "Enter first number (1 digit) : " WITH NO ADVANCING.
ACCEPT Num1.
DISPLAY "Enter second number (1 digit) : " WITH NO ADVANCING.
ACCEPT Num2.
MULTIPLY Num1 BY Num2 GIVING Result.
DISPLAY "Result is = ", Result.
STOP RUN.


D


#!/usr/bin/dmd -run
/* sh style script syntax is supported */

/* Hello World in D
To compile:
dmd hello.d
or to optimize:
dmd -O -inline -release hello.d
*/

/+
a nested /+
comment
+/
+/

a = /+ // +/ 1; // parses as if 'a = 1;'
a = /+ "+/" +/ 1"; // parses as if 'a = " +/ 1";'
a = /+ /* +/ */ 3; // parses as if 'a = */ 3;'

r"hello"
r"c:\root\foo.exe"
r"ab\n" // string is 4 characters, 'a', 'b', '\', 'n'

`hello`
`c:\root\foo.exe`
`ab\n` // string is 4 characters, 'a', 'b', '\', 'n'

x"0A" // same as "\x0A"
x"00 FBCD 32FD 0A" // same as "\x00\xFB\xCD\x32\xFD\x0A"

"hello"c // char[]
"hello"w // wchar[]
"hello"d // dchar[]

import std.stdio;

void main(string[] args)
{
writefln("Hello World, Reloaded");

// auto type inference and built-in foreach
foreach (argc, argv; args)
{
// Object Oriented Programming
auto cl = new CmdLin(argc, argv);
// Improved typesafe printf
writeln(cl.argnum, cl.suffix, " arg: ", cl.argv);
// Automatic or explicit memory management
delete cl;
}

// Nested structs and classes
struct specs
{
// all members automatically initialized
int count, allocated;
}

// Nested functions can refer to outer
// variables like args
specs argspecs()
{
specs* s = new specs;
// no need for '->'
s.count = args.length; // get length of array with .length
s.allocated = typeof(args).sizeof; // built-in native type properties
foreach (argv; args)
s.allocated += argv.length * typeof(argv[0]).sizeof;
return *s;
}

// built-in string and common string operations
writefln("argc = %d, " ~ "allocated = %d",
argspecs().count, argspecs().allocated);
}

class CmdLin
{
private int _argc;
private string _argv;

public:
this(int argc, string argv) // constructor
{
_argc = argc;
_argv = argv;
}

int argnum()
{
return _argc + 1;
}

string argv()
{
return _argv;
}

string suffix()
{
string suffix = "th";
switch (_argc)
{
case 0:
suffix = "st";
break;
case 1:
suffix = "nd";
break;
case 2:
suffix = "rd";
break;
default:
break;
}
return suffix;
}
}


erlang


-module(sudoku).
-author(vmiklos@frugalware.org).
-vsn('2009-11-10').
-compile(export_all).

% Return the value of Fun or an empty list based on the value of If.
% @spec fun_or_empty(If::bool(), Fun::fun() -> [any()]) -> Ret::[any()]
% Ret = Fun() if If is true, [] otherwise.
fun_or_empty(If, Fun) ->
case If of
true -> Fun();
_ -> []
end.

% Return a cell from a field.
% @spec field(I::integer(), J::integer(), Table::[any()], M::integer()) ->
% Ret::any()
% Table is a flatten list of lists, M is the length of a row,
% representing a matrix, Ret is the cell in the Ith row and Jth column.
field(I, J, Table, M) ->
P = (I-1)*M+J,
case P > length(Table) of
true -> 0;
_ -> lists:nth((I-1)*M+J, Table)
end.

% Return a cell from a field.
% @spec field(I::integer(), J::integer(), Table::[[any()]]) ->
% Ret::any()
% Ret is the cell in the Ith row and Jth column of Table.
field(I, J, Table) ->
lists:nth(J, lists:nth(I, Table)).


compiler output


no need to highlight this
c:\f\g\Makefile:1346:10: warning: overriding commands for target `styleformatter.h.texinfo' foo
/f/g/Makefile:1346:10: warning: overriding commands for target `styleformatter.h.texinfo' foo
/foo/bar/Makefile:1337: error: ignoring old commands for target 'styleformatter.h.texinfo' bar
\foo\bar\Makefile:1346: warning: overriding commands for target `styleformatter.h.texinfo'
Makefile:1337: warning: ignoring old commands for target `styleformatter.h.texinfo'


manifest files


Manifest-Version: 1.0
Bundle-ManifestVersion: 2
Bundle-Name: %pluginName
Bundle-SymbolicName: org.eclipse.mindmap.diagram; singleton:=true
Bundle-Version: 1.0.0.qualifier
Bundle-ClassPath: .
Bundle-Activator: org.eclipse.mindmap.diagram.part.MindmapDiagramEditorPlugin
Bundle-Vendor: %providerName
Bundle-Localization: plugin
Export-Package: org.eclipse.mindmap.diagram.edit.parts,
org.eclipse.mindmap.diagram.part,
org.eclipse.mindmap.diagram.providers
Require-Bundle: org.eclipse.core.runtime,
org.eclipse.core.resources,
org.eclipse.core.expressions,
org.eclipse.draw2d;visibility:=reexport,
org.eclipse.gmf.runtime.draw2d.ui;visibility:=reexport,
org.eclipse.mindmap;visibility:=reexport,
org.eclipse.mindmap.edit;visibility:=reexport,
org.eclipse.gef;visibility:=reexport,
org.eclipse.ocl.ecore;visibility:=reexport,
org.eclipse.emf.validation;visibility:=reexport,
org.eclipse.emf.validation.ocl;visibility:=reexport
Eclipse-LazyStart: true


vbscript


' The script can be called via

<%@LANGUAGE="VBSCRIPT" CODEPAGE="1252"%>

if AQresponse <> "" then
response.write(AQresponse)
else
response.write("ERROR")
end if

%>

' Actual script follows. This could be placed in a separate file,
' such as the smslib.asp file described above

<%
Dim method, secured, error_on_length, username, password, AQresponse
' User Editable Variables
secured = 0 ' Set to either 1 for SSL connection
' or 0 for normal connection.
error_on_length = 1 ' Whether to give and error on messages over 160 chracters.
' 1 for true, 0 for false.
username = "testusername" ' Your aql username, can either be set here
' or done on a per call basis from the function.
password = "testpassword" ' Your aql password, can either be set here
' or done on a per call basis from the function.

Dim objXMLHTTP, xml
message = replace(message," ","+")
Set xml = Server.CreateObject("Microsoft.XMLHTTP")
if secured = null or secured = 0 then
xml.Open "POST", "http://gw1.aql.com/sms/sms_gw.php", False
xml.setRequestHeader "Content-Type", "application/x-www-form-urlencoded"
xml.Send "username=" & username & "&password=" & password & "&destination=" & destination &
"&message=" & message & "&originator=" & originator & "&flash=" & flash
else if secured = 1 then
xml.Open "POST", "https://gw1.aql.com/sms/sms_gw.php", False
xml.setRequestHeader "Content-Type", "application/x-www-form-urlencoded"
xml.Send "username=" & username & "&password=" & password & "&destination=" & destination &
"&message=" & message & "&originator=" & originator & "&flash=" & flash
else
call senderror(7)
end if
end if

AQresponse = xml.responseText
Set xml = nothing

End Function


%>


That's all for now :)

Sunday, December 06, 2009

Huawei E1692 in Linux Kubuntu 9.10 Karmic

In a previous post I blogged about sucessfully installing this Huawei E1692 Internet device in Ubuntu Jaunty. Now that I switched to Kubuntu Karmic I found out that this device was not recognized any more.

Fortunately, this was a known issue, and I found this blog post which summarizes the solution to use this device also in Ubuntu Karmic.

I followed the instructions, however, the device still didn't show up (in particular, it wasn't mounted as an external device so that I could run the installation procedure). Probably it's a problem of Kubuntu and not Ubuntu (and I don't have Ubuntu version of Karmic, but only the Kubuntu one), so I cannot tell for sure.

However, you only need to perform some manual steps and it works in Kubuntu as well.

First, you need to follow the instructions found in this blog post anyway.

First of all, by running dmesg after inserting the device you should see something like the following lines which, at least, tells you that the device is recognized (though not mounted):

[  664.188996] usb-storage: device found at 6                              
[ 664.188998] usb-storage: waiting for device to settle before scanning
[ 664.189997] scsi9 : SCSI emulation for USB Mass Storage devices
[ 664.190571] usb-storage: device found at 6
[ 664.190573] usb-storage: waiting for device to settle before scanning
[ 669.189727] usb-storage: device scan complete
[ 669.191577] scsi 8:0:0:0: CD-ROM HUAWEI Mass Storage 2.31 PQ: 0 ANSI: 2
[ 669.191585] usb-storage: device scan complete
[ 669.194267] scsi 9:0:0:0: Direct-Access HUAWEI SD Storage 2.31 PQ: 0 ANSI: 2
[ 669.212737] sr1: scsi-1 drive
[ 669.213052] sr 8:0:0:0: Attached scsi CD-ROM sr1
[ 669.213215] sr 8:0:0:0: Attached scsi generic sg2 type 5
[ 669.214044] sd 9:0:0:0: Attached scsi generic sg3 type 0
[ 669.235684] sd 9:0:0:0: [sdb] Attached SCSI removable disk
In particular, this tells that the "CD" part of the device is represented by sr1, so you run
sudo mount -t iso9660 /dev/sr1 /mnt/
and then you can run the installation
sudo /mnt/install_linux
You should see a terminal window

and after that, you should see the applet


After the installation, the device is detected automatically by the system, the applet shows up, and you won't need to do the mount manually.

Hope this helps :-)

Saturday, November 28, 2009

QtFindReplaceDialog - a Find/Replace Qt dialog

Since I have not found an implementation of a Find /Replace dialog to be used in Qt text editor based applications, I thought I'd try to create one myself:

QtFindReplaceDialog is an implementation of a Find/Replace Qt dialog to be used in qt text edit based applications. A simple Find (only) dialog is also provided. The dialogs can be used as a library, or simply by importing the sources into your own applications. QtFindReplaceDialog is free and open source LGPL software.


Thursday, November 05, 2009

Compiling Qt 4.6 from sources

If you feel like trying the new Qt 4.6, which is currently in beta, and if you're using Linux, for which it is available only in source code package, or if you need the current development version from the git repository (for instance, for building the git repository version of Qt-Creator, you'll have to compile qt from sources.

This is quite straightforward, but I'll blog it here, in case it might provide some help for those who never compiled it.

If you obtained the source package, then you'll need to unpack it somewhere in your home.

If you want the git version (of course you need the git program), you'll first obtain the sources from the git repository:

git clone git://gitorious.org/qt/qt.git
and then switch to the 4.6 branch
cd qt
git checkout -b 4.6 origin/4.6
Now, instead of compiling qt in the same directory where the sources are, let's make a shadow build, so that the source directory will stay untouched; this will also allow us to do possible several builds of the library (e.g., we may want to do a static build of the library, a debug build, etc.). Thus we create a build directory where we'll run the compilation (note that at the moment the build directory must be at the same level, thus we must not create the build directory inside the source directory).

Thus, for instance, this are the directories I have for building qt
bettini@bettini-desktop-karmic:~/install/qt-git$ ll
total 8
drwxr-xr-x 2 bettini bettini 4096 2009-11-04 21:33 build
drwxr-xr-x 17 bettini bettini 4096 2009-11-04 21:33 qt
(where qt is where you have the qt sources; in case you got the source archive, this directory might be called something like qt-everywhere-opensource-src-4.6.0-beta1).

Now, let's enter the build directory and run the configure script. If you don't pass any -prefix option to configure, the library will be built to be installed into the directory /usr/local/Trolltech/Qt-4.6.0/):
cd build
../qt/configure
you'll have to answer some questions, and then you'll be ready to compile:
Which edition of Qt do you want to use ?

Type 'c' if you want to use the Commercial Edition.
Type 'o' if you want to use the Open Source Edition.

Preparing build tree...

This is the Qt/X11 Open Source Edition.

You are licensed to use this software under the terms of
the Lesser GNU General Public License (LGPL) versions 2.1.

Type 'L' to view the Lesser GNU General Public License version 2.1.
Type 'yes' to accept this license offer.
Type 'no' to decline this license offer.

Do you accept the terms of the license?


Qt is now configured for building. Just run 'make'.
Once everything is built, you must run 'make install'.
Qt will be installed into /usr/local/Trolltech/Qt-4.6-git

To reconfigure, run 'make confclean' and 'configure'.
Now you're ready to run make and wait for about a couple of hours (even more if you don't have a fast machine); of course you may want to tweak the configuration so that you don't build some parts of qt (e.g., the examples); you may want to take a look at configure options by running configure --help.

After compilation ended, you can install the library; if you chose to install it in a path which is not your home, remember that you need superuser privileges:
sudo make install
When this ended, you'll have your qt installed in the path specified at configuration time (or the default one), e.g.:
bettini@bettini-prog-karmic:~$ ll /usr/local/Trolltech/Qt-4.6.0/
total 364
drwxr-xr-x 2 root root 4096 2009-11-05 07:30 bin
drwxr-xr-x 22 root root 4096 2009-11-05 07:29 demos
drwxr-xr-x 5 root root 4096 2009-11-05 07:30 doc
drwxr-xr-x 36 root root 4096 2009-11-05 07:29 examples
drwxr-xr-x 21 root root 4096 2009-11-05 07:28 include
drwxr-xr-x 3 root root 4096 2009-11-05 07:28 lib
drwxr-xr-x 96 root root 4096 2009-11-05 07:30 mkspecs
drwxr-xr-x 2 root root 4096 2009-11-05 07:28 phrasebooks
drwxr-xr-x 10 root root 4096 2009-11-05 07:28 plugins
-rw-r--r-- 1 root root 332881 2009-10-13 09:43 q3porting.xml
Note that sometimes documentation is not installed (you can take a look at the doc directory which should have html and qch subdirectories). I experienced this if I use a different prefix at configuration time. If this is the case, you need to first build explicitly the documentation with make docs and then, run the same configure command again (i.e., with the same options), and then run the make install command another time, and the documentation should be installed correctly.

Now, you're ready to enjoy the qtdemo, by running /usr/local/Trolltech/Qt-4.6.0/bin/qtdemo

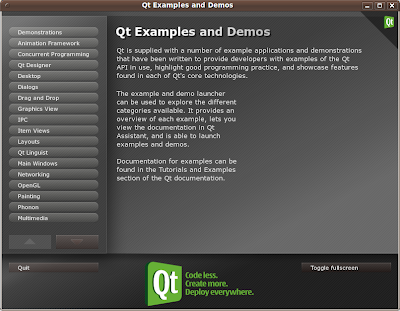
Now, if you have another version of qt already installed in your system (e.g., the one packaged for your distribution) and you want to use the one you've just compiled it?

Well, thanks to qmake, this is quite easy: it's just a matter of invoking the qmake of your compiled version of qt (instead of the one in the system path).

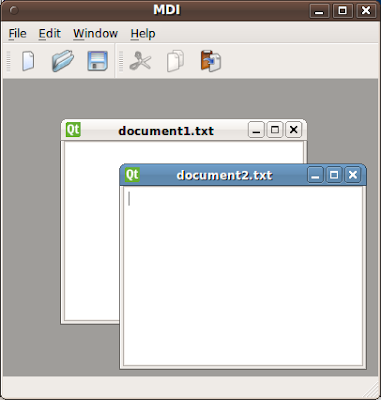
For instance, let's take the mdi example that comes with qt, and let's take, for instance, the one already installed in your system (if you don't have qt examples already installed from your distribution, you can still take the one that is in the sources you downloaded), and copy it into a local folder:
bettini@bettini-prog-karmic:~/tmp/qt$ cp -rf /usr/lib/qt4/examples/mainwindows/mdi .
cd mdi

If I want to build this example using the version of qt we've just compiled it's just a matter of running
/usr/local/Trolltech/Qt-4.6.0/bin/qmake mdi.pro
Now, if I run make, the g++ compiler will be invoked with the right include path and library path for our compiled version of qt:
make
For instance, here's some output (note the -I and -L options):
g++ -c -pipe -O2 -Wall -W -D_REENTRANT -DQT_NO_DEBUG -DQT_GUI_LIB -DQT_CORE_LIB -DQT_SHARED -I/usr/local/Trolltech/Qt-4.6.0/mkspecs/linux-g++ -I. -I/usr/local/Trolltech/Qt-4.6.0/include/QtCore -I/usr/local/Trolltech/Qt-4.6.0/include/QtGui -I/usr/local/Trolltech/Qt-4.6.0/include -I. -o main.o main.cpp
...
/usr/local/Trolltech/Qt-4.6.0/bin/moc -DQT_NO_DEBUG -DQT_GUI_LIB -DQT_CORE_LIB -DQT_SHARED -I/usr/local/Trolltech/Qt-4.6.0/mkspecs/linux-g++ -I. -I/usr/local/Trolltech/Qt-4.6.0/include/QtCore -I/usr/local/Trolltech/Qt-4.6.0/include/QtGui -I/usr/local/Trolltech/Qt-4.6.0/include -I. mdichild.h -o moc_mdichild.cpp
...
g++ -Wl,-O1 -Wl,-rpath,/usr/local/Trolltech/Qt-4.6.0/lib -o mdi main.o mainwindow.o mdichild.o moc_mainwindow.o moc_mdichild.o qrc_mdi.o -L/usr/local/Trolltech/Qt-4.6.0/lib -lQtGui -L/usr/local/Trolltech/Qt-4.6.0/lib -L/usr/X11R6/lib -lQtCore -lpthread
By the way, note that the right version of the moc compiler is used (and the same holds for uic if your application needs it).

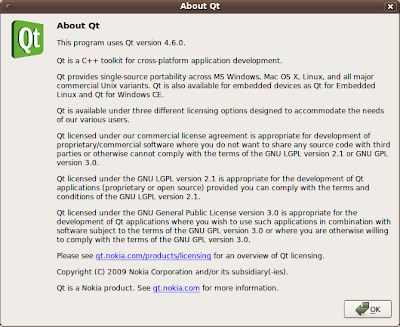
If you now run the mdi program, and choose the Help -> About Qt menu item, you'll get the proof you're using your version of qt 4.6


Let's do some more experiments, and recompile the mdi example with the system version of qt (thus, it's better to get rid of the mdi directory and get a fresh new copy of the mdi example). Now we use the system version of qmake:
qmake -version
QMake version 2.01a
Using Qt version 4.5.2 in /usr/lib
and let's build the example this way
qmake mdi.pro
make
Note that the compiler options are now different

g++ -c -pipe -O2 -Wall -W -D_REENTRANT -DQT_NO_DEBUG -DQT_GUI_LIB -DQT_CORE_LIB -DQT_SHARED -I/usr/share/qt4/mkspecs/linux-g++ -I. -I/usr/include/qt4/QtCore -I/usr/include/qt4/QtGui -I/usr/include/qt4 -I. -o main.o main.cpp
...
/usr/bin/moc-qt4 -DQT_NO_DEBUG -DQT_GUI_LIB -DQT_CORE_LIB -DQT_SHARED -I/usr/share/qt4/mkspecs/linux-g++ -I. -I/usr/include/qt4/QtCore -I/usr/include/qt4/QtGui -I/usr/include/qt4 -I. mdichild.h -o moc_mdichild.cpp
...
g++ -c -pipe -O2 -Wall -W -D_REENTRANT -DQT_NO_DEBUG -DQT_GUI_LIB -DQT_CORE_LIB -DQT_SHARED -I/usr/share/qt4/mkspecs/linux-g++ -I. -I/usr/include/qt4/QtCore -I/usr/include/qt4/QtGui -I/usr/include/qt4 -I. -o qrc_mdi.o qrc_mdi.cpp
g++ -Wl,-O1 -o mdi main.o mainwindow.o mdichild.o moc_mainwindow.o moc_mdichild.o qrc_mdi.o -L/usr/lib -lQtGui -lQtCore -lpthread
If we run the application and select the about qt menu item we can see that we have the 4.5 version of qt:


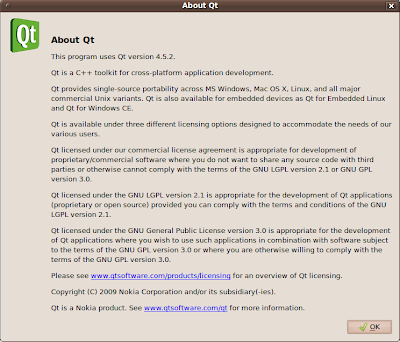
However, you can run this application, which is built using qt 4.5, so that it uses the 4.6 version of the library you compiled from source (assuming that we are using dynamically linked library):
LD_LIBRARY_PATH=/usr/local/Trolltech/Qt-4.6.0/lib ./mdi
This will force the dynamic linker to use the 4.6 version of the dynamic libraries.

Again, you can get the evidence using the about qt menu item.

This is possible due to version 4.6 being backward compatible.

Have fun with Qt :-)

Saturday, October 10, 2009

Keep track of your network usage using vnstat

Since I started using my mobile connection to connect to Internet (now and then), I felt the need to keep track of my network usage (since I only have 500mb a month, and my provider doesn't seem to provide the usage on a website). And of course, I'm talking Linux OS ;-)

I stumbled upon this nice software, vnstat, http://humdi.net/vnstat, which really suits my needs.

Unfortunately, the version that comes with Ubuntu is quite old, so I was suggested in the forum, to download and compile from sources the latest version from the website.

After unpackaged the tarbal, it's just a matter of running make install (as a superuser)

sudo make install
Installing vnStat...
Installing config to /etc/vnstat.conf
install -d -m 755 /usr/bin /usr/sbin /usr/share/man/man1 /usr/share/man/man5 /var/lib/vnstat
install -s -m 755 src/vnstat /usr/bin
install -s -m 755 src/vnstatd /usr/sbin
install -m 644 man/vnstat.1 /usr/share/man/man1
install -m 644 man/vnstatd.1 /usr/share/man/man1
install -m 644 man/vnstat.conf.5 /usr/share/man/man5
Then, the first time, you need to create the database; since I'm interested in my ppp0 mobile connection, I did
sudo vnstat --force -u -i ppp0
Before starting, I prefered to tweak the configuration a bit, so I created $HOME/.vnstatrc and I added this option
# interface specific limits
# example 8Mbit limit for eth0 (remove # to activate):
#MaxBWeth0 8
MaxBWppp0 8
This seemed to help getting rid of those annoying 4gb spikes. (On a side note, I often use the application that came with my Internet Huawei card, which often, very often, suffer from those 4gb spikes which definitely spoil the statistics of network usage, that's why I had to find a better solution to keep track of that.)

Now you can setup the vnstat daemon so that it starts automatically when the computer starts
sudo cp examples/init.d/ubuntu/vnstat /etc/init.d/
sudo chmod 755 /etc/init.d/vnstat
sudo update-rc.d vnstat defaults
And if you want to start it right now
sudo /etc/init.d/vnstat start
Every 5 minutes the daemon updates the database with the statistics (of course you can configure many things, see the vnstat documentation).

You can see the current statistics
bettini@bettini-laptop:~$ vnstat
Database updated: Sat Oct 10 15:37:54 2009

ppp0 since 04.09.09

rx: 292.90 MiB tx: 104.48 MiB total: 397.38 MiB

monthly
rx | tx | total | avg. rate
------------------------+-------------+-------------+---------------
Sep '09 243.74 MiB | 88.89 MiB | 332.62 MiB | 1.05 kbit/s
Oct '09 49.16 MiB | 15.59 MiB | 64.76 MiB | 0.64 kbit/s
------------------------+-------------+-------------+---------------
estimated 157 MiB | 48 MiB | 205 MiB |

daily
rx | tx | total | avg. rate
------------------------+-------------+-------------+---------------
yesterday 329 KiB | 172 KiB | 501 KiB | 0.05 kbit/s
today 7.91 MiB | 2.25 MiB | 10.16 MiB | 1.48 kbit/s
------------------------+-------------+-------------+---------------
estimated 10 MiB | 3 MiB | 13 MiB |

The daily statistics
bettini@bettini-laptop:~$ vnstat -d

ppp0 / daily

day rx | tx | total | avg. rate
------------------------+-------------+-------------+---------------
04.09. 8.96 MiB | 6.99 MiB | 15.94 MiB | 1.51 kbit/s
05.09. 12.05 MiB | 4.37 MiB | 16.42 MiB | 1.56 kbit/s
06.09. 9.21 MiB | 4.14 MiB | 13.35 MiB | 1.27 kbit/s
08.09. 25.17 MiB | 9.68 MiB | 34.86 MiB | 3.30 kbit/s
09.09. 6.64 MiB | 2.74 MiB | 9.38 MiB | 0.89 kbit/s
10.09. 22.53 MiB | 7.88 MiB | 30.41 MiB | 2.88 kbit/s
12.09. 10.58 MiB | 4.64 MiB | 15.22 MiB | 1.44 kbit/s
13.09. 5.13 MiB | 2.07 MiB | 7.21 MiB | 0.68 kbit/s
14.09. 7.67 MiB | 2.18 MiB | 9.86 MiB | 0.93 kbit/s
18.09. 12.54 MiB | 2.31 MiB | 14.85 MiB | 1.41 kbit/s
19.09. 16.28 MiB | 5.14 MiB | 21.42 MiB | 2.03 kbit/s
20.09. 4.76 MiB | 1.47 MiB | 6.24 MiB | 0.59 kbit/s
22.09. 11.99 MiB | 4.29 MiB | 16.27 MiB | 1.54 kbit/s
23.09. 17.75 MiB | 8.66 MiB | 26.41 MiB | 2.50 kbit/s
24.09. 8.80 MiB | 2.94 MiB | 11.74 MiB | 1.11 kbit/s
26.09. 15.72 MiB | 4.99 MiB | 20.71 MiB | 1.96 kbit/s
27.09. 383 KiB | 108 KiB | 491 KiB | 0.05 kbit/s
29.09. 23.36 MiB | 6.18 MiB | 29.55 MiB | 2.80 kbit/s
30.09. 24.23 MiB | 8.09 MiB | 32.32 MiB | 3.06 kbit/s
01.10. 9.90 MiB | 5.62 MiB | 15.52 MiB | 1.47 kbit/s
04.10. 22.22 MiB | 5.15 MiB | 27.37 MiB | 2.60 kbit/s
05.10. 8.81 MiB | 2.40 MiB | 11.21 MiB | 1.06 kbit/s
09.10. 329 KiB | 172 KiB | 501 KiB | 0.05 kbit/s
10.10. 7.91 MiB | 2.25 MiB | 10.16 MiB | 1.48 kbit/s
------------------------+-------------+-------------+---------------
estimated 10 MiB | 3 MiB | 13 MiB |

for months
bettini@bettini-laptop:~$ vnstat -m

ppp0 / monthly

month rx | tx | total | avg. rate
------------------------+--------------+--------------+---------------
Sep '09 243.74 MiB | 88.89 MiB | 332.62 MiB | 1.05 kbit/s
Oct '09 49.25 MiB | 15.68 MiB | 64.93 MiB | 0.64 kbit/s
------------------------+--------------+--------------+---------------
estimated 157 MiB | 48 MiB | 205 MiB |

and so on.

Very nice! :-)

Sunday, October 04, 2009

QSource-Highlight - a Qt interface for GNU Source-Highlight

I recently released a new software developed with Qt 4 (this summer I took a chance to use qt and really enjoyed this wonderful framework): QSource-Highlight - a Qt interface for GNU Source-Highlight.

You can highlight your code on the fly, and have the highlighted output in all the formats supported by source-highlight (e.g., HTML, LaTeX, Texinfo, etc.). You can then copy the formatted output and paste it (e.g., in your blog), or save it to a file.

A preview of the highlighted output is available for some output formats (e.g., HTML, XHTML, etc.).


Here are some screenshots:

The preview of highlighting of some selected lines, with line numbers and 4 context lines.

The preview with line numbers (using '-' as padding char).

Latex (with color) output (source, no preview), with "entire doc" option.

The language definition file is automatically selected according to the input file extension, but you can change it manually by using the corresponding combo box. In particular you have three combo boxes:

  • the combo box for the input language definition (e.g., C, C++, Java, etc.); in particular, the combo box refers to the .lang files of Source-Highlight, which, however, should have quite intuitive names.
  • the combo box for the output format (e.g., HTML, LaTeX, etc.); in particular, the combo box refers to the .outlang files of Source-Highlight, which, however, should have quite intuitive names (e.g., htmltable.outlang generates HTML output into an html table).
  • the combo box for the highlighting style (e.g., colors, and formats of the elements of the language); these elements refer to Source-Highlight .style files and to .css files.

All the files named in these combo boxes refer to files shipped with Source-highlight, and they are searched for in the Source-highlight corresponding installation path. In case the combo boxes are empty, then the path where source-highlight searches for these files is wrong: you should then configure the correct path for source-highlight using the settings dialog (Source-Highlight Settings).


The complete documentation is available here.


QSource-Highlight uses the library included in GNU Source-Highlight, since version 3, thus you need that library to build QSource-Highlight; in particular it uses Source-Highlight-Qt (which I've already blogged about) additional library, http://srchiliteqt.sourceforge.net, which provides highlighting in Qt relying on GNU Source-Highlight. Thus, you need to install Source-Highlight-Qt as well. we refer to GNU Source-Highlight's and Source-Highlight-Qt's websites for further information about the library and its installation (you may want to check whether your distribution already provides packages for these two libraries).

Thursday, October 01, 2009

Compiling Boost Regex in Linux

Boost libraries provide many interesting C++ libraries with cool functionalities. I've been using for many years now boost shared pointers and boost regex library (for regular expression). In particular, I'm using them in my software GNU Source-Highlight. These libraries are usually available in LInux distributions, but if they are not, and you need to build them (compile them) from sources... well... here comes trouble :-)

The first time, it is actually not easy to build boost libraries from sources, even though you're used to build programs from sources following the usual "./configure && make && make install"; in particular, boost use their own build system based on bjam. Indeed, I've had many complaints from source-highlight users when it comes to build source-highlight and the boost libraries are not available in their system.

I hope this post sheds some light for building boost libraries from source. In particular, I'll concentrate on regex library (in fact, you're not required to build all the libraries: you can simply select the ones you're interested in). Note that some boost libraries come only in the shape of header files (like shared pointers) and others require also a lib file (like regex). Note, however, that all the header files will be installed anyway (they basically do not require any compilation), while library files require compilation, and compiling all the libraries in boost may require some time; thus, having the chance to select only some libraries is quite useful.

In this post I'll assume that you want to build only the regex library and to install all the built files into $HOME/opt/boost (so that you will not need root access rights).

Once you unpacked the sources into a directory, say ~boost

tar xjvf ~/Downloads/boost_1_39_0.tar.bz2
you get into that directory
cd ~boost
and run the booststrap command
./bootstrap.sh \
--prefix=$HOME/opt/boost \
--libdir=$HOME/opt/boost/lib \
--with-libraries=regex
Hopefully, you will get no error, and then you're ready to build and install the boost headers and the regex library with the following command:
./bjam --build-dir=build --layout=system install
This will install the directories include and lib into $HOME/opt/boost.

You can now test your installation using the example program you find in the boost website, example.cpp:

#include <boost/regex.hpp>
#include <iostream>
#include <string>

int main()
{
std::string line;
boost::regex pat( "^Subject: (Re: |Aw: )*(.*)" );

while (std::cin)
{
std::getline(std::cin, line);
boost::smatch matches;
if (boost::regex_match(line, matches, pat))
std::cout << matches[2] << std::endl;
}
}

Since you installed boost in a directory which is probably not in the search path of your compiler, you will need to specify the path for header inclusion and the path for library, as follows:
g++ -I$HOME/opt/boost/include example.cpp -o example \
-L$HOME/opt/boost/lib -lboost_regex
If everything went fine, you'll have your program to test.

If you want to run your program, remember that the boost regex library you built is a dynamic library, thus, again, since it is not installed in a system path where the loader searches for libraries to load at run-time, you'll need to specify that path with the environment variable LD_LIBRARY_PATH, e.g.,
LD_LIBRARY_PATH=$HOME/opt/boost/lib ./example
As I said before, you could have install the library and headers in system path, e.g., /usr; all you have to do is to specify a different bootstrap command
./bootstrap.sh \
--prefix=/usr \
--libdir=/usr/lib \
--with-libraries=regex
and then run bjam as before (but with root privileges).

Hope this helps :-)

Monday, September 28, 2009

Source-Highlight-Qt 0.2

The release 0.2 of Source-Highlight-Qt is out! Source-Highlight-Qt is a library for performing syntax highlighting in Qt documents by relying on GNU Source-Highlight library.

The main new features are (besides some bugfixes):

  • You can customize colors in the color dialog also for elements not defined in the current style
  • A new dialog for source-highlight settings is now provided (see the screenshot)
  • A combo box is provided also for selecting the output format of highlighting
  • Some functionalities are provided for generating a .style file (e.g., starting from the settings of the color and style dialog)
  • Some message boxes can be used to display source-highlight exceptions

Basically, all the new additions were functional for the new software I released (I'll blog about that in the next few days): QSource-Highlight, i.e., a Qt4 graphical interface for source-highlight itself :-)

Tuesday, September 22, 2009

GNU Source-Highlight 3.1.1

In this new version of GNU Source-Highlight some additions were made to the API of the library; the most important are:

  • access to static global LangDefManager, LangMaps is provided through the new class Instances so that there's no need to create continuously instances of these classes;
  • the library also provides now utility functions for accessing .lang and .outlang files;
  • functions are provided for setting the data dir option globally, in order to increase consistency in applications that use the library (changing such value globally makes sure that the change will be visible in all parts of the library).
Moreover, two new language definition files were added: Texinfo and Haskell (thanks to Sergey Astanin); here are two examples:

texinfo

(@ref{Generating References}).
\input texinfo @c -*-texinfo-*-
@c This file uses the @command command introduced in Texinfo 4.0.
@c %**start of header
@setfilename source-highlight.info
@include version.texi
@settitle GNU Source-highlight @value{VERSION}
@finalout
@c @setchapternewpage odd
@c %**end of header

@example
my example
@end example

@set myhomepage @uref{http://www.lorenzobettini.it}

field names, etc.) by relying on the program @emph{ctags},
@url{http://ctags.sourceforge.net}
@xref{My Long
Reference}.

@inforef{Introduction,,source-highlight-info}.

@c All the menus can be updated with the EMACS command
@c texinfo-all-menus-update, which is normally bound to C-c C-u C-a.
@menu
* Introduction:: What's it for?
* Installation:: Download and installation
* Invoking source-highlight:: How to run @command{source-highlight}.
* Language Definitions:: How to define an input language
* Problems:: Reporting bugs.
* Mailing Lists::
* Concept Index:: Index of concepts.
@end menu

This is an escaped @@ at symbol.

This ``is a string''.

@example
@i{/// read the files }FIXME@i{ of a directory }@@param@i{ }@b{<f} foo="bar"@b{>}

@b{#include} <stddef.h>
@b{#include} <stdio.h>
@b{#include} <sys/types.h>
@b{#include} <dirent.h>

int
@b{main} (void)
@{
DIR *dp;
@b{struct} dirent *ep;

dp = @b{opendir} ("./");
@b{if} (dp != NULL)
@{
@b{while} (ep = @b{readdir} (dp))
@b{puts} (ep->d_name);
(void) @b{closedir} (dp);
@}
@b{else}
@b{perror} ("Couldn't open the directory");

@b{return} 0;
@}

@end example


haskell

-- A test snippet based on
-- http://google-code-prettify.googlecode.com/svn/trunk/tests/prettify_test.html
--
-- A comment
These --> are --| not |-- comments
--but this is a comment again

module Foo(bar) where
import Blah
import BlahBlah(blah)
import Monads(Exception(..), FIO(..),unFIO,handle,runFIO,fixFIO,fio,
write,writeln,HasNext(..),HasOutput(..))

{- nested comments
- should {- just -} work -}
instance Thingy Foo where
a = b

data Foo :: (* -> * -> *) -> * > * -> * where
Nil :: Foo a b c
Cons :: a b c -> Foo abc -> Foo a b c

str = "Foo\\Bar"
chars = [ 'x', '\'', '\\', '\"', '\120', '\o100', '\xbeef' ] -- Escapes too
Not.A.Char = 'too long' -- Don't barf. Show that 't is a lexical error.

(ident, ident', Fo''o.b'ar)

(0, 12, 0x45, 0xA7, 0o177, 0O377, 0.1, 1.0, 1e3, 0.5E-3, 1.0E+45)

[1,2..10]

(#) = \x y -> s x y
where s x y = (x+y) `mod` 13

bar (x:_) = putStrLn x

main = do
let foo x = do { spam $ eggs x }
foo >>= bar